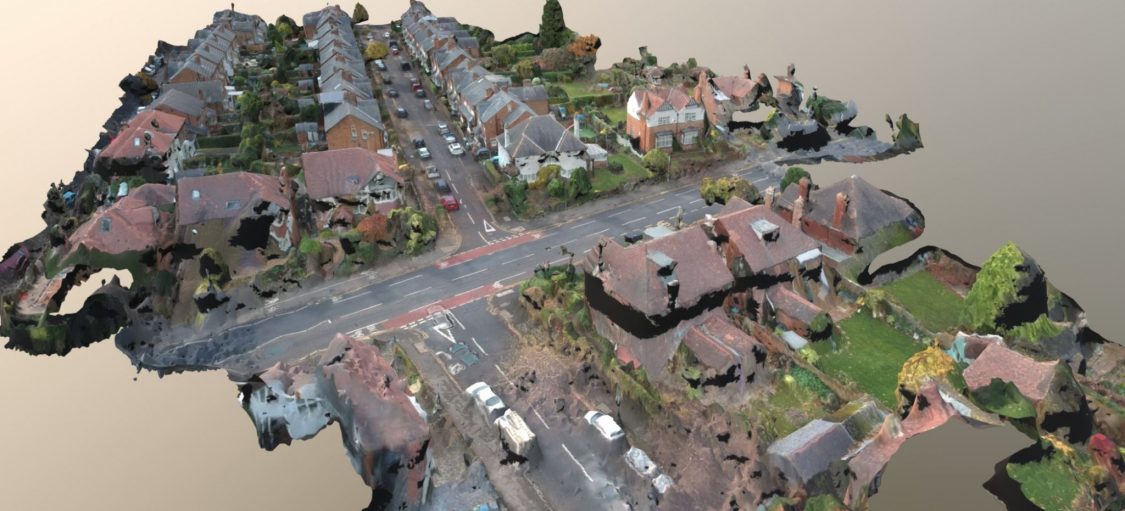
Using my DJI Spark drone and taking around 40 photographs using its built-in camera, I was able to make a 3D reconstruction of where I live:
All posts by Jonathan Hassall

Videos from when I had a drone back in 2017:
See also the 3D model I created from my drone photographs using photogrammetry and a lot of patience:
Aerial 3D Model Created with Drone Through Photogrammetry
Manual Traffic Surveys
Many people in the UK may be familiar with seeing groups of people, or sometimes a parked vechicle, clearly displaying a sign saying ‘Traffic Survey.’ These people are employed to keep a tally of the number of vehicles using a road, and the types of vehicles. This information is important for planning infrastructure, helping more efficient provision of transport capacity for cars, trucks/lorries and buses.
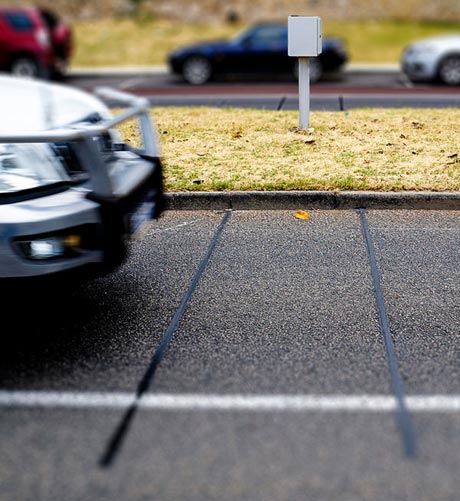
Pressure Sensors

Many will also have seen temporary pressure sensors across roads, linked to a data collection box attached to a street lamp. This system also provides useful data on the number of vehicles using a road.
By using two pressure sensors, its possible to fairly accurately record the numbers of vehicles passing in two directions. However, there may be some inaccuracies when vehicles pass simultaneously or almost simultaneously. A 15-minute time period may have an inaccuracy of 10% (http://www.windmill.co.uk/vehicle-sensing.html). For roads with more than two lanes, accuracy would be even less and the system probably wouldn’t be feasible.
Electronic Sensors
There are also electronic solutions dug into roads, which I’ve noticed on approaches to traffic lights. These may be used to alter timings of traffic lights depending on traffic, and it seems they could also be used for traffic survey data collection. You may have noticed traffic lights changing as you approach them, and a system like this may be detecting the mechanical energy of your vehicle passing over sensors. I expect there are also magnetic versions of these sensors, that sense the metallic body of a vehicle. Sometimes motorcycles in the US do not trigger these systems at automated intersections, causing problems, and some state laws allowing vehicles to pass if a sensor fails to detect a vehicle’s presence.
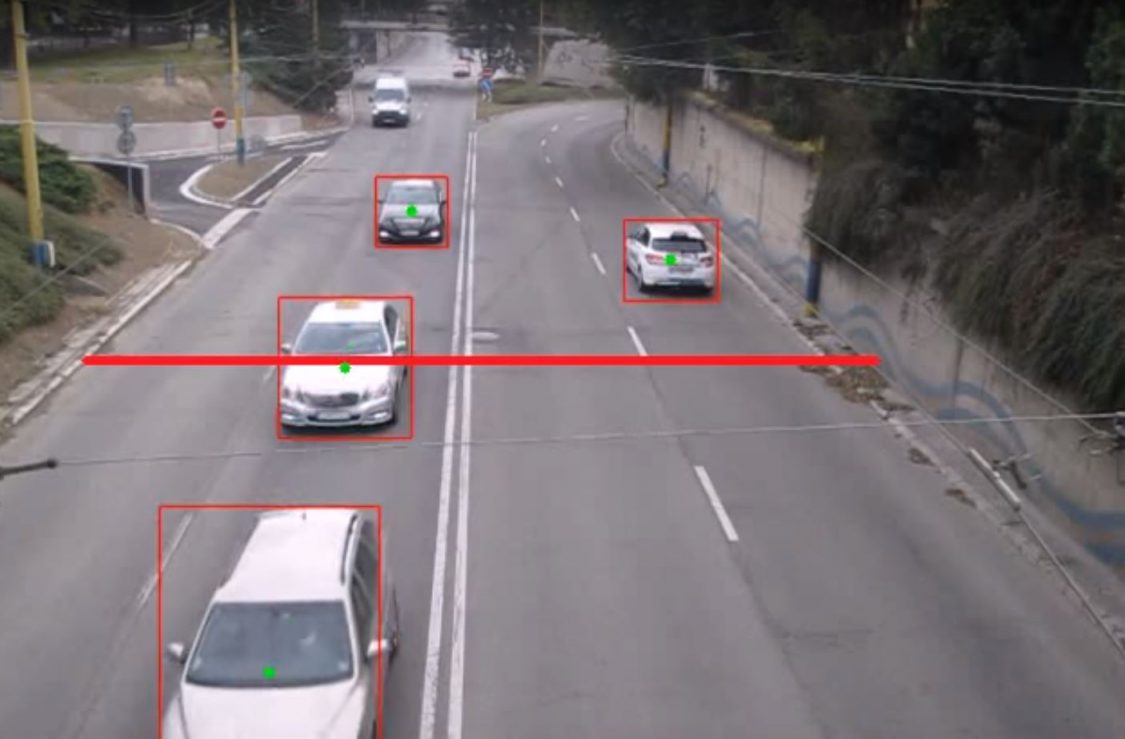
Video Surveys
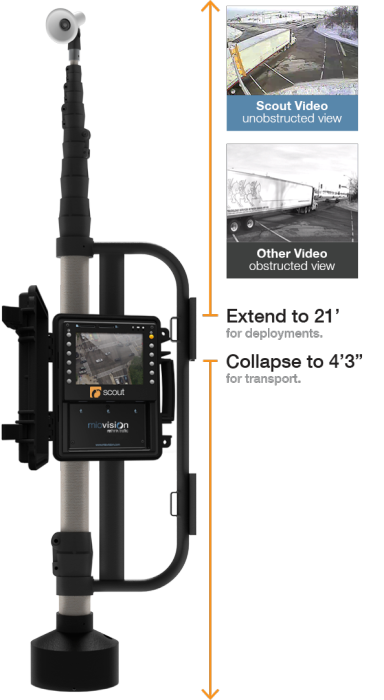
I’ve noticed what seems like a new technology recently, with a video camera mounted on a street light, and a data collection box attached to it. After researching it, these are video cameras that record conventional HD video for a period of 3 to 7 days. The model I saw in use also has advanced features like remote management and event alerts sent via mobile cellular networks (LTE), allowing settings to be changed and notifications of problems without having to travel back to where the unit is deployed.
Computer Vision (CV)
I expect computer vision techniques (e.g. OpenCV) are later used to analyse the numbers and types of vehicles passing:
Anonymity and Privacy
I expect there are strict rules in place to prevent ANPR (Automatic Number Plate Recognition) being used, as this may violate the privacy of drivers. However, if there are not, I expect travel time surveys could be made by calculating how long a commute takes for individual drivers, and how they change over time. Perhaps if this was calculated anonymously, it would be a usable technique.
While there have been companies that have monitored cellphones with Bluetooth and Wi-Fi serial numbers, often the general public have expressed concerns over privacy. An example hardware provider for this is http://www.libelium.com.
In conclusion, I found it interesting to research what these cameras and other equipment I see are used for, and expect it is an interesting field analysing queues of videos for traffic data.


Here are a few important ways to speed up page loading times, together with the improved recorded times for comparison on a typical WordPress web site. While WordPress is hardly an optimized web application, it does benefit from the same speedup methods as most web applications.
I used Google Chrome Developer Tools to time network transfers and page load times. There are various web-based tools available as well:
- https://developers.google.com/speed/pagespeed
- https://tools.pingdom.com
- https://www.webpagetest.org
Initial speed — 1.412 sec (TTFB 0.12 sec)
This was the speed on a fresh install of a WordPress web site on a small VPS running Nginx and PHP-FPM.
Enabling GZip compression — 1.326 sec (TTFB 0.13 sec)
Using compression on network transfers can greatly reduce file sizes, especially for text-based files such as HTML, CSS and JavaScript. The CPU overhead on modern servers is negligible, and can be cached if required.
PHP Opcode cache — 1.299 sec (TTFB 0.124 sec)
PHP scripts are typically compiled to bytecode on demand. By caching this complication with OPcache or APC, page load times and server load can be significantly reduced. APC did include a fast key/value cache, which has now been replaced by APCu.
WordPress Cache — 0.733 sec (TTFB 0.122 sec)
There are many WordPress cache plugins available, which reduce the amount of PHP code that has to be run on every request. Some caches can generate flat files, which are significantly faster, and can be used with Nginx.
Nginx FastCGI Cache — 0.731 sec (TTFB 0.119 sec)
Nginx is able to use a fast memory/disk cache to cache requests to PHP-FPM, further reducing page load times and server loads. This can be very beneficial on web sites with high load.
There are many other ways to speed up page load times, including dependency concatenation and minification and image optimization. It is also important to optimize client-side JavaScript to allow the user’s web browser to display content quickly.
AnyCast DNS
An initial visit to a web site requires a DNS lookup. Traditionally DNS has no way to send requests to the geographically closest server, but this is possible with AnyCast DNS. This feature is available on many providers including Amazon’s Route 53, Google’s Cloud Platform and Microsoft Azure. It functions by allowing multiple servers distributed throughout the world to have the same IP address.
By using AnyCast DNS, I was able to reduce an initial DNS request from 93 milliseconds to 18 milliseconds. Combined with having an optimized web server geographically close, even an initial visit to a web page can be displayed instantaneously.


Conclusion
Subtracting the round trip time to the server of 0.116 seconds, these optimizations reduced the effective Time To First Byte to 3 milliseconds. On a busy server, these optimizations will make a significant difference to the capacity of the server.

The general push to use SSL/HTTPS for every web site is improving security and privacy on the Internet. However, every request a web site makes will need to be secure, or browsers can remove the ‘Secure’ indicator, show a warning symbol, and sometimes pop up errors.
You can add a simple header that will tell browsers to report back to your server if any insecure requests are made. I combined this with a simple PHP script that logs to the server’s error log. This alerts me to sites I host and develop that have insecure content, so I can fix them.
Step 1 — Add the Content Security Policy reporting header
add_header Content-Security-Policy-Report-Only "report-uri /csp-report-endpoint.php";
Step 2 — Add PHP Script
Add this simple PHP script as csp-report-endpoint.php:
<?php
error_log(file_get_contents("php://input"));
Now, when a site attempts to load an insecure resource, you will get a message in your error log, and you can use this information to fix your site.

These simple steps can improve your Qualys SSL Report to an A+:
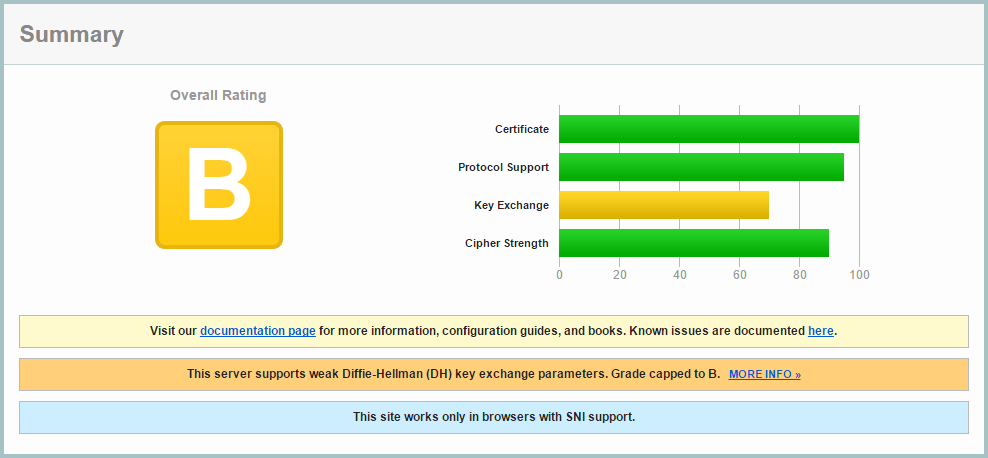
Step 1: Getting my initial report (B):
You can get a Qualys SSL Report on any site. My rating started as a B with a reasonably good setup:
Step 2: Improving Ciphers List
SSL v2 is insecure, so it needed to be disabled, and SSLv3 also needed to be disabled as TLS 1.0 suffers a downgrade attack, allowing an attacker to force SSLv3 disabling forward secrecy. I updated my nginx config to use:
ssl_protocols TLSv1 TLSv1.1 TLSv1.2;
I opted to configure this in the main nginx.conf file, rather than each domain, as I saw now reason I would make individual changes on a domain basis.
I also enabled ssl_prefer_server_ciphers and ssl_session_cache:
ssl_prefer_server_ciphers on;
ssl_session_cache shared:SSL:10m;
And used this cipher suite which maintains maximum backwards compatibility. Although I’m using SNI which isn’t supported by IE6, I prefer my sites to be as backwards compatible as possible.
ssl_ciphers "EECDH+AESGCM:EDH+AESGCM:ECDHE-RSA-AES128-GCM-SHA256:AES256+EECDH:DHE-RSA-AES128-GCM-SHA256:AES256+EDH:ECDHE-RSA-AES256-GCM-SHA384:DHE-RSA-AES256-GCM-SHA384:ECDHE-RSA-AES256-SHA384:ECDHE-RSA-AES128-SHA256:ECDHE-RSA-AES256-SHA:ECDHE-RSA-AES128-SHA:DHE-RSA-AES256-SHA256:DHE-RSA-AES128-SHA256:DHE-RSA-AES256-SHA:DHE-RSA-AES128-SHA:ECDHE-RSA-DES-CBC3-SHA:EDH-RSA-DES-CBC3-SHA:AES256-GCM-SHA384:AES128-GCM-SHA256:AES256-SHA256:AES128-SHA256:AES256-SHA:AES128-SHA:DES-CBC3-SHA:HIGH:!aNULL:!eNULL:!EXPORT:!DES:!MD5:!PSK:!RC4";
I also added these lines:
ssl_prefer_server_ciphers on;
 ssl_session_cache shared:SSL:10m;
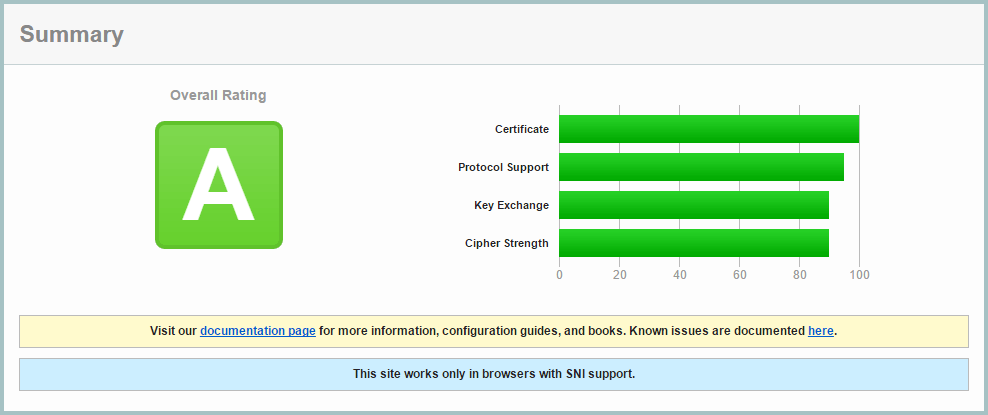
I retested the site, and improved to an A rating:
Step 3: Deffie Hellman Ephemeral Parameters
Diffie-Hellman ensures that pre-master keys cannot be intercepted by Man In The Middle attacks, and it is easy to enable in Nginx.
First generate a stronger DHE parameter… be prepared to wait around 15 minutes for OpenSSL to generate this certificate:
cd /etc/ssl/certs
openssl dhparam -out dhparam.pem 4096
Then configure Nginx to use it:
ssl_dhparam /etc/ssl/certs/dhparam.pem;
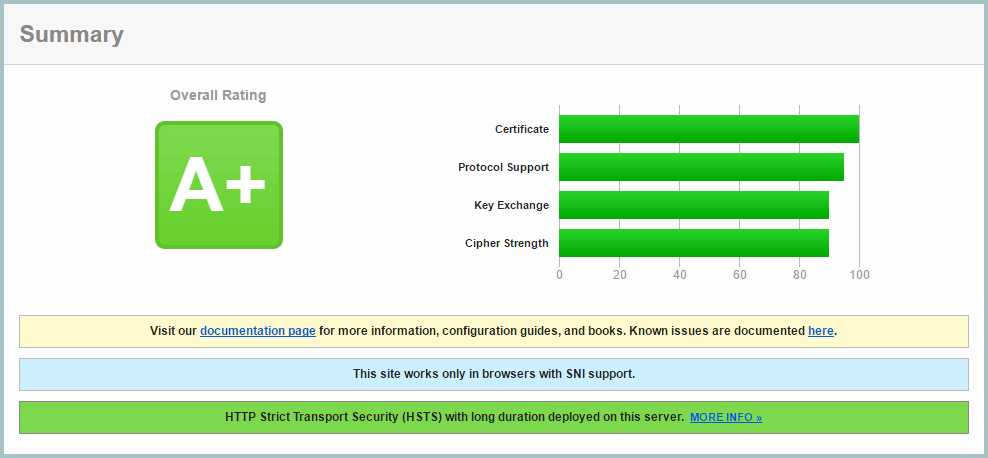
On retesting, I achieved the A+ grade!
Step 4: Add a DNS CAA record
The Certification Authority Authorization (CAA) DNS record allows you to use your DNS records as a mechanism to whitelist certificate authorities that are allowed to issue certificates for their hostnames.
To implement this, I had to change from Amazon AWS Route 53, to Google Cloud DNS, as AWS shamefully doesn’t provide CAA report.
I use Let’s Encrypt, and added this DNS record:
0 issue "letsencrypt.org"
Currently this is optional, but it will be mandatory from September 2017.
Step 5: Add HTTP Strict Transport Security (HSTS) Header
A header can be sent from your server which will inform browsers to only make HTTPS requests. Browsers will no longer make HTTP requests until the header expires. This has two main benefits: a spoofed site without your SSL certificate will not be effective, and subsequent visits to your site will go straight to your HTTPS version without a redirect, making page loading faster.
Be sure to use a low expiry time while developing your site, as once a browser caches the header, it is not possible to clear it. Once you’ve sent this header, expect your site to be HTTPS in the long term, with no going back.
add_header Strict-Transport-Security "max-age=31536000; preload" always;
For development, use this shorter time:
add_header Strict-Transport-Security "max-age=360;" always;
There is a push to have browsers have a preloaded list of HTTPS/HSTS enabled sites, but the strict requirements for submission require several sub-domain redirects, which in my opinion would reduce overall performance. I don’t see the harm in still sending the ‘preload’ parameter.